Showing posts with label Kid crafts. Show all posts

Friday, September 4, 2009

Kids Craft: Caterpillar Greeting Card

fabric card greetings caterpillar kids art

While Thumbprint Caterpillar cards were fun, Ana, my 4-yr-old, seemed to want more. That's how this fabric-card caterpillar project came about.

Items Used: scraps of cotton fabric, card stock paper, craft glue, scissors, googly eyes, dried garden debris, pink fuzz

kids crafts caterpillar fabric greeting card


  • Step 1: Cut some scrap fabric to reasonable size/shape

  • Step 2: Apply some glue generously on card stock paper and paste the pieces of fabric willy-nilly covering the entire surface

  • Step 3: Allow it to dry a little

  • Step 4: On the backside of the card stock paper with glued-on fabric, draw little circles with some bottle cap, without much wastage

  • Step 5: Cut out the circles as best as possible

  • Step 6: Fold a card stock paper to required greeting card size; Glue these cut out circles onto it to make the caterpillar form; cut little antennae from the remains of the fabric-card or use twigs from the garden

  • Step 7: Add fuzz, twigs, and other yard debris for texture; glue eyes with googly eyes or beads; glue pink fuzz or a piece of yarn or any other handy thing for a smiley mouth

  • Step 8: Stand back and beam

Ana needed some help cutting out the circles - the card stock with glued on fabric was rather thick making it tough even for me to cut out.

Disclaimer: we were not aiming for anatomically correct reproductions, just something conjured up with some imagination and produced with available items at hand.

A variation: To get extra dimension and effect, we took little strips of card stock paper about 0.5cm wide by 1.5cm long, tri-folded it, glued one per circle on the back, then, glued the other end (flat surface) of the tri-fold strip on to the greeting card, for the standard "raised" effect.

Also glued leaves from the backyard tree for legs/hair, and Ana's touch: glue some green leaves for the caterpillar to eat. Of course, when the leaves dry out they will naturally fall off, so, make this card fresh and hand it over to the lucky recipient right away :)

kids art fabric greeting card caterpillar butterfly

And, when caterpillars are here, can butterflies be far behind?

This butterfly is Ana's imagination: There was enough fabric-glued card leftover from making caterpillars and Ana started cutting them up just like that. And, seeing that there were purple and pink pieces that sort of looked like butterfly wings, she started gluing the various pieces to resemble the butterfly form. There were leftover antennae pieces that she didn't want to throw away so they came in handy as well. I gave her the buttons just for effect.

greeting cards with fabric and paper caterpillar butterfly children's project


Monday, January 26, 2009

Kids Crafts: Dragon Puppet

The Year of the Ox
is here!

kids craft dragon puppet chinese new year ox 2009


And, to commemorate it, Ana and I made a little craft project over the weekend.

[Also posted here]

Materials used: Card stock paper for head and tail, construction paper for accordion-folded body, two bamboo skewers (or straws or even long Popsicle sticks if preferred), craft glue or cello tape, color markers or paints or crayons or glitter glue to decorate the dragon

The idea is not original, of course. I was looking around for activities to do with Ana and came upon various versions of this project on the web and decided to give it a try.

Ana decided it had to be a girl dragon and didn't like any of the elongated reptilian head I came up with, so, we went with a jolly-looking round-faced dragon with a weird pout and pointy ears/horns :)

Next time, we probably will try to make the dragon fancier - maybe glue glitter and tissue paper to make shiny scales, and probably try a more traditional-looking face...

Method:
  1. make a head and a face from the card stock paper, and decorate it as you please
  2. fold along the long edge and cut the construction paper; make a fan fold or accordion fold with both the pieces and glue them together to form a long accordion body
  3. glue the head, body and tail appropriately
  4. glue the straws or Popsicle sticks or bamboo skewers one at the head and one at the tail to hold it up and make it dance

Sunday, February 3, 2008

Valentine patchwork hearts!


Well, February is here and that decidedly means some craft time. And after more than a month, Winkie and me picked up scissor and glue and got down to some relaxing business. What triggered this was a cool craft idea delivered to my inbox in the weekly newsletter. This is how it goes...

MATERIALS

Scrap bits of 3 or 4 different fabrics
Glue
Scissors
A cardboard cutout in the heart shape
Thick cardstock paper

As you can see, very simple materials. I get very excited when nothing has to be bought and everything is available from some corner of the house!

METHOD

  • Cut out some paper from the thick cardstock, to the dimensions of the card that you need.

  • Fold in middle and fold it back out again.

  • Glue on the fabric scraps.

  • Allow to dry, then fold in half again and cut out a heart shape, with the folding edge intact.

  • And there it is! A colourful fabric patchwork heart!

We are thinking of sending this as a surprise post to the grandparents, with a little inscription inside.

Tuesday, December 11, 2007

Holiday crafts

Decoupage Christmas Tree

This year, me and Winkie have been really proactive and well ahead of time in getting done with some of our holiday crafts. First was the Christmas gift for his teacher. We made a little Christmas tree from scratch on regular craft paper, with bits of mulberry scraps and mounted onto a picture frame. It was very easy to do, and Winkie was able to help too. Of course, I guided him in the 'exact' placement of each bit of paper and he was careful to do that. And then, I had him do another one, all by himself, without me breathing down his neck, as a reward for following instructions so nicely on the first one. And this is what he came up with. Once he got done with it, he was more than a little upset that his didn't look like mine, and didn't look like a Christmas tree at all. I had to convince him that it was a special tree. But he could be mollified only after we got another frame to mount his on. Phew!

Beaded Ganesha

Taking off from the Christmas tree, I started thinking about New Year's greetings and general season's greetings, when a little container of beads that I had had on me for a long time, peeped out at me from the craft box. And so came into form this little beaded Ganesha. Again, an outline was drawn on some heavy craft paper and I glued little bits on the paper and positioned the beads, first forming the outline and then filling it in as best as I could. Winkie couldn't help me with this one, but he did watch for a while. It took me about 3 hours, done in little batches of time to finish it.

The best part of trying something new is that newer ideas come into being along the way. By the end of it, your mind is buzzing with ideas and it just gets better and better. An idea I had while doing this one, is that I could have gotten different coloured beads for the eyes, and for the different body parts etc. It would have looked more interesting. Then I started thinking about doing a little more elaborate work that could be mounted as wall art eventually. The possibilities are endless.

But for now, these 2 simple craft ideas for the holiday season! Have fun.

Tuesday, October 9, 2007

Little crafted box cars

[This post is written by Tharini of Winkie's Way.]

As if Winkie does not have enough train engines, freight cars and track sets, I set out to give him one more. This time crafted from scratch, with the simplest of materials lying around the house. The original idea came in a little weekly craft newsletter. Usually I would glance through them, and since I won't have one or the other raw material at home, I would reject it. But a quick look at the list of stuff needed for this craft and I knew I wanted to try it with Winkie. Take a look at the list yourself. Isn't it simple and easy?

4 matchboxes
Paint
Buttons or black stickers
Aluminium foil
Glue
Scissors
Marker pen
Ribbon

Cool huh?

I didn't follow the exact instructions. Once I got a rough idea, I did my own thing.

1. Took out all the little boxes from the matchbox and painted them in different colours.

2. Took a little ribbon and glued the boxes to the ribbon, so all the box cars get connected.

3. Glued on little coloured buttons for the wheels.

4. Cut half a matchbox and glued it on to the first car, so it becomes the engine.

5. You can used scrunched up circles of foil glued on to the first car, and make it the train lights, or use little silver sequins like me.

6. As an additional personal touch, and since I had them at home, I used some alphabet beads I had lying around (I was to make key chains for every member of the family with those, abandoned the idea when R refused to use his!)...and glued them on to the boxcars, named after Winkie and Thambi.

This was the result. In the original idea, they used the matchbox covers as the actual box cars, and the match'box' with the open side up, was laid on top, and filled with little pebbles so it had the total freight car feel. I should do it that way next time.


Winkie does like them, and its easy for him to play with this mini set on the dining table. And for the past 24 hours, he has set aside his Thomas Trains and Salty engines for the simple pleasures of home made goods.

Friday, September 21, 2007

Memory Cards

[posted by Sheela at The Joy of My Life. Many thanks to Sandeepa for reminding me to post it at our DMC! ]

memory pairs children's card game concentration
Concentration or Memory is a simple game that helps improve memory in children (and adults). There are several versions of this game. Some involve objects, but this here is for little Ana, with home-made cards.

The cards are laid out face down. Each player takes a turn and flips 2 cards at random. If the cards match, they get to keep the pair. If they don't, they put it back exactly where they flipped them. The memory part is that, they should try to remember which position had which card, so, that as the game progresses, the matching act becomes less of a random guess and more of a test of memory.

For Ana, who is 2 years old, the maximum number of cards I use at a time is 12 - which involve 6 pairs, with each pair having a particular picture she easily recognizes and can match without any shred of doubt.

These are home-made cards, so, when I detect some wear, I make new ones. They are not as sturdy as the store-bought laminated cards, and the pictures are not as pretty and colorful. But, it serves the purpose :-)

memory pairs children's card game concentration

Supplies I used: card stock paper, paper cutter, rubber stamps, rubber stamp ink pad, some construction paper and dye-cut punch, pinking shears, glue stick.

memory pairs children's card game concentration

We don't use color cartridges in our printer, so, I didn't try to design graphics on my computer and print them out. At some point, I would like to print out just the black&white outline and color them, rather than using rubber stamps.

But, the reason I chose to use rubber stamps is so that I can make the cards with Ana. She likes to help me make things, even if she has no clue what I am making. "Let's make some memory cards, Ana" is all I had to say the first time, and when she saw me gather my supplies and settle down, she faithfully sat next to me, observing for a while, then asking to try and glue the flowers at the back and so on... Of course, I always go back and "adjust" it so it looks more uniform.

She is fascinated by the pinking shears and knows it as "Amma's soosuss" (scissors) and has her own plastic scissors with which she tries to clip her hair, her toys and such, of course, without success as it is just toy scissors.

And, while I try to rubber stamp her memory cards as uniformly as I can, she has a blast stamping on her "art" notebook. Her preferred ink color is the turquoise blue, for some reason!

Anyway, as she gets older, I hope to have fun having her design her own cards, and more of them - I can't wait to play with about 50 cards all laid out and trying to match them from memory with Ana...

D and I play with Ana. We don't really insist on turns, as sometimes Ana is so carried away with flipping that she does manage to get all the pairs. This can be played like Solitaire, so, if we can encourage her to get into this game, we could let her play on her own down the road and enjoy the "free time" we get meanwhile ;-)


Monday, August 27, 2007

Rainy day activities...

[This post is written by Tharini of Winkie's Way.]

One of my fellow bloggers gave me the suggestion to put together a list of rainy day activities. And I had a pleasurable time recollecting all the little things me and Winkie have done so far, which gave us both many moments of absorption and harmony.


Cut-out sewing pieces

: I found these really interesting things at the Chalkboard

. Little cardboard cutout shapes, with little holes, and multi coloured laces. The idea is much like the basic running stitch. And it encourages the little ones to improve the dexterity in their fingers, which paves the way for beginner writing. This is one of the things Winkie did in school when he first joined Montessori at 2 and a 1/2. And he enjoyed it sooo much there, that I bought one for our home use, and it has filled many a lazy hour with purpose. Even now, he enjoys doing it from time to time whenever I remember to pull it out from the shelf. Another nice thing about it is that you can use these cutouts to trace figures with. And tracing is such fun and once again encourages the fine motor skills of the hands, and you can start off holding the shape, while your child traces, and then progress to letting him hold the shape himself while he traces.

Pasta painted necklace : This is another activity that they did in school. Simple pasta shells of assorted shapes, sizes and designs are coloured on with simple kid friendly paints, allowed to dry and then strung on a twine to make a necklace. It was quite a hands on project that you can do right away, without having to gather/buy too many materials. And with so many different pasta shapes out there....this is a fun project. Unfortunately, I don't have any pictures to show for it, for that necklace of mine has gone missing. :(


Flash cards :

I first bought flash cards when Winkie was close to 2 and 1/2 and we were travelling to India on vacation. This was a means to keep him busy onflight. And it kept him busy for a long long time. There are so many different types of flash cards out there....right from beginner stuff to school level concepts and at least 3 different types of games you can play with each set. And who's to stop you from coming up with more of your own! Definitely a rainy day pick!

Bubble baths :

I resort to this even on regular days, when I am busy and he wants some fun which I can't provide. Run a warm bath, and put in my favorite lavender scent, throw in all the rubber playmates and bubble blowers and he's floated off into his own world for the next 30 precious minutes.

Board games :

He's highly into this right now and up for a game of Boggle, Sequence, Memory or Brain Quest anytime. It takes a while in the beginning to establish an understanding of the game in his mind, but once that is done and we have a few games underway, he becomes quite a delightful playmate, with an attention span of 30 min or under.

Activity books :

You know....like the colouring books, connect the dots, find your way through the maze...that kind of thing.

Little sweeper :

I bought it more so because it was sooo cute but I think it holds good promise for the future. I am speaking of a small little kid sized broom to rope him in to help me sweep up the messy areas. Whenever I used to do it, he'd want to get his hands on the big broom and it was too long to be wieldy enough for him. So this was perfect. I am yet to see him help me properly in the task, but I think we'll get there!

The Cooker :

When he was younger....in that cuddly old age of 2 and thereabouts, he would just loooove to cook. He'd ask for a little pan, a spatula, some dried beans, a glass of water and a little bowl and he would happily absorb himself for a good 1/2 hour. Those were the days! Of course there was a bit of mess to wipe off, and he'd always love to help! Nowadays though, the attention span for the same activity is greatly reduced, he makes a greater mess and refuses to help clean up. But for what its worth, this little activity was a big favorite of his in those days and he'd cook everyday.

Baking :

This is still a hit with Winkie. He loves to help

me bake. Right from measuring and pouring the ingredients, breaking the eggs, whipping it all together, spooning lumps for cookies and being the official taster, he was wholly involved.

Sticker books :

He got the stickers fascination when he was gifted a sticker book by his teacher for his 3rd birthday. We used to work on it almost every evening, little at a time. It is pretty laborious finding the right stickers to stick on each page...and even now we still have many pages we haven't fully finished.

Well, that's it for now. Hoping to hear more suggestions from you guys and add them to the list so its gets more comprehensive for future use. So....write in! :)

Edited to add more activities based on your feedbacks:

Legos: A perennial hit and something that can grow with your child.

Foam Stickers : A very versatile activity, and tons you can do with it.

Indoor Camping :

This is sure to be a hit. Maybe the tents could be brought out only for these special wet days. This also reminds me of those cute tunnels that you get in Ikea. Pretty cheap, and nice to have in the basement, and Winkie can spend endless time inside it with all his favorite toys for company.

Some wonderful websites to look into:

http://www.kneebouncers.com/

http://www.teletubbies.com/

http://www.noggin.com/

http://familyfun.go.com/arts-and-crafts/season/tool/craftfinder_tlp/

http://crafts.kaboose.com/index.html

http://www.highlightskids.com/

http://www.preschooleducation.com/

http://www.enchantedlearning.com/crafts/

http://www.angelfire.com/dc/childsplay/Themes.htm

http://www.dltk-kids.com/

http://www.hitentertainment.com/artattack/menu_artattacks.html

http://fun.familyeducation.com/crafts/games/32870.html

http://www.gulf-shores-alabama-condo-rentals.com/free-printable-travel-games.html

http://www.momsminivan.com/bigkids.html

Sunday, June 17, 2007

kids craft: Father's Day Art

father's day toddler art craft finger painting

Toddlers love to finger paint and get messy. Usually, the work is not frame-worthy and gets saved for a while and then tossed out. One way to preserve them for a while is to make a keepsake out of some of the special work they do: like, turn them into a piece of art, or into greeting card...

Ana likes to finger paint and has been finger painting since about one year old. I have saved most her "work" so far and have used them in hand-made greeting cards and such. I like the vivid colors of the tempera paints, and the milder hues of the finger-painting paints.

I was wondering what to do for Father's Day... and Ana gave me the start!

Last weekend, she had finished painting a piece - usually, that's when she asks me to unroll some more paper on her easel so she can paint on blank paper again... While unrolling some more for her, I decided to tear the piece she had just finished and turn it into "art" for Appa. The painting you see is entirely Ana's work.

While there is more of that story in my blog , I just wanted to quickly share one way to make little gifts for close friends and family (who else is going to appreciate this, right??!)

To make her painting into a quick souvenir and gift for her Appa, I simply mounted Ana's art on a mat I had, added a loop to hang it from. And then, gave a few stickers to Ana to paste it on the mat just for added effect :-)

Of course, Ana cannot write yet, so, I added some words and a stamp and...

Voila! Daddy has a nice little Father's Day gift made (mostly) by his baby girl to proudly hang on his office wall!

Thursday, June 14, 2007

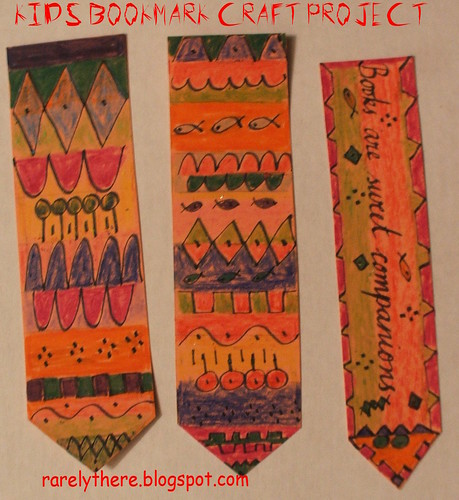
Kids Craft: Bookmarks


This is a nice little project for 4-6 year olds who can either copy a pattern or come up with their own whimsical ones. The nice thing about this project is that it is small, it is useful and can be done during birthday parties and given away as party favors. And, probably can work as an incentive to read books :-)

Ana is too little to color "properly" with her crayons and markers, let alone color within boundaries and draw designs. But, I remember doing a few craft projects with my cousins when I was baby sitting them and wanted to try it with Ana anyway...

I used card stock paper, had Ana scribble with her crayons, and cut out bookmark shapes around it to incorporate her work. Then, of course, I had to finish it myself as my 2-yr old simply does not have the skills in place to do it herself.

Any thick paper would do. Perhaps start the kids off with some pattern that you draw and have them color whimsically... this is a very simple project, nothing much to it, really... feels silly posting it here as a craft project, but, I've posted this on my blog, and, just thought I'd share it here as well.

Cheers!

Thursday, April 19, 2007

Simple tested Kid crafts

[This post is written by Tharini of Winkie's Way.]

Hi Girls...

Just sharing here a new craft that Winkie and I, did together yesterday. We are crafting in full swing now. He's been home nursing a cold, and so every afternoon, when he tires of his trains and computer games, we sit down to constructively use our hands. I plan to make a regular chronicle of all the odds and ends we craft together, because he has begun to enjoy it, and I dare say we can make some things that will be of some value around the house. Also, it will serve as a databank for anyone looking for ideas, and I can look forward to some feedback and ideas in return.

Project : Pencil holder

Materials needed :

Some plain cardboard material (I used the scrap cover from a clock I once bought)

Popsicle sticks (I got them from walmart)

Kid friendly non toxic glue

Cello-tape

Scissors (the adult ones, you'll be doing all the cutting in this one)

Total Time required: 2 hours

Method:

1. Cut the 4 sides of the box to the measurements you want, and then cello-tape them together from the inside to form a box. I don't think glue would have worked for the joining. Also, cello-taping from the inside is better, otw, when you glue the sticks on to the sides of the box, they don't remain steady.

2. Then cut a square for the base and make it slightly bigger than the actual base of the box. Use glue to connect the box to the base. Let it remain for 15 min, so it holds firm.

3. Start glueing the sticks to the sides of the box to finish all four sides. You can use any permutation of colours that you like. Let it hold for 1/2 an hour.

4. Then cut off the extra bits from the base, so none of the cardboard sticks out. (pun unintended)!

5. Find a use for it. I wanted to build upon the riot of colours and use it to house his colour pencils. (*pssst*...this makes a great Father's Day gift, for Dad to display on his desk at work.)

PS - I appreciate any suggestions on how better we could have accomplished this. Also, its my desire to craft with things lying around the house, things that we may normally recycle or trash without a second thought, and not have to buy from the stores other than the regular stuff like colour pencils/paints, some basic craft paper, etc. Its going to be a challenge, but I'm sure its doable. It would be great if you all can also share your ideas towards the same and any projects that you have undertaken with your children. Age no bar on this one. :)